> ## Documentation Index
> Fetch the complete documentation index at: https://docs.toolip.io/llms.txt
> Use this file to discover all available pages before exploring further.
# How to Set Up Toolip With Helium Scraper
> Integrate Toolip with Helium Scraper for secure, efficient, and anonymous web scraping with flexible proxy management.
 ## What is Helium Scraper?
**Helium Scraper** is an easy-to-use desktop tool that simplifies web scraping. With its visual interface, you can extract and organize data from websites without any coding knowledge. Designed for freelancers, marketers, and businesses, it’s perfect for small to medium-scale scraping projects.
Whether you're gathering product prices, customer reviews, or any other web data, Helium Scraper streamlines the process, saving time and effort while delivering structured results.
Prefer an enterprise-grade guide? Learn more about Oculus Proxies Helium Scraper Integration Guide.
Targeting search engines like Google, Bing, or Yandex requires a specialized proxy to ensure stable access and avoid blocks. **Toolip’s Search Engine ISP Proxies** are designed specifically for this, providing reliable performance where standard proxies may fail. If your proxy test isn't working on search engines, switching to **Search Engine ISP Proxies** can resolve the issue.
1\. [**Download Helium Scraper**](https://www.heliumscraper.com/eng/download.php) and install it on your computer.
2\. Once installed, launch the application to start setting up your scraping environment.
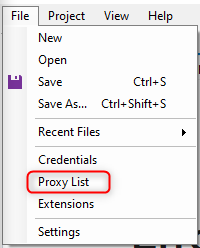
1\. In Helium Scraper, navigate to **File > Proxy List**.
2\. This will open the proxy configuration panel where you can manage your proxy settings.
## What is Helium Scraper?
**Helium Scraper** is an easy-to-use desktop tool that simplifies web scraping. With its visual interface, you can extract and organize data from websites without any coding knowledge. Designed for freelancers, marketers, and businesses, it’s perfect for small to medium-scale scraping projects.
Whether you're gathering product prices, customer reviews, or any other web data, Helium Scraper streamlines the process, saving time and effort while delivering structured results.
Prefer an enterprise-grade guide? Learn more about Oculus Proxies Helium Scraper Integration Guide.
Targeting search engines like Google, Bing, or Yandex requires a specialized proxy to ensure stable access and avoid blocks. **Toolip’s Search Engine ISP Proxies** are designed specifically for this, providing reliable performance where standard proxies may fail. If your proxy test isn't working on search engines, switching to **Search Engine ISP Proxies** can resolve the issue.
1\. [**Download Helium Scraper**](https://www.heliumscraper.com/eng/download.php) and install it on your computer.
2\. Once installed, launch the application to start setting up your scraping environment.
1\. In Helium Scraper, navigate to **File > Proxy List**.
2\. This will open the proxy configuration panel where you can manage your proxy settings.
 1\. Add your Toolip proxy details in the provided fields:
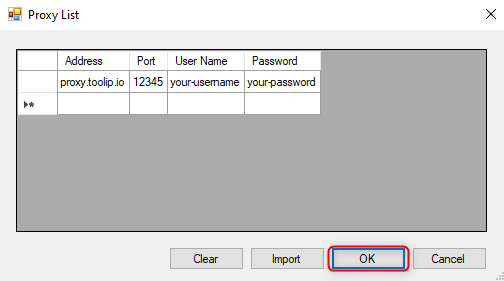
* **Address**: Enter `proxy.toolip.io`.
* **Port**: Use the port number provided in your [Toolip dashboard](https://toolip.io/dashboard/page/plans).
* **Username**: Enter your Toolip proxy `username`.
* **Password**: Enter your Toolip proxy `password`.
2\. Click **OK** to save the proxy settings.
1\. Add your Toolip proxy details in the provided fields:
* **Address**: Enter `proxy.toolip.io`.
* **Port**: Use the port number provided in your [Toolip dashboard](https://toolip.io/dashboard/page/plans).
* **Username**: Enter your Toolip proxy `username`.
* **Password**: Enter your Toolip proxy `password`.
2\. Click **OK** to save the proxy settings.
 For country-specific proxies, use the format `your-username-country-US` to receive a US exit node.
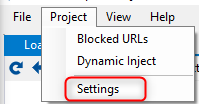
1\. Go to **Project > Settings** from the main menu.
For country-specific proxies, use the format `your-username-country-US` to receive a US exit node.
1\. Go to **Project > Settings** from the main menu.
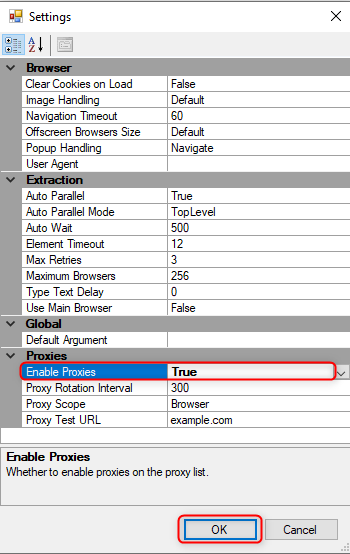
 2\. In the settings window, locate the **Enable Proxies** option, set it to **True**, and click **OK**.
 1\. Use Helium Scraper’s built-in browser to open a website that displays your IP address (e.g., [httpbin.org/ip](http://httpbin.org/ip)).
2\. Ensure the displayed IP matches your Toolip proxy settings to confirm the integration is successful.
You’ve now successfully integrated **Toolip** with **Helium Scraper**. Enjoy secure and efficient web scraping with enhanced privacy and flexibility! 🚀
1\. Use Helium Scraper’s built-in browser to open a website that displays your IP address (e.g., [httpbin.org/ip](http://httpbin.org/ip)).
2\. Ensure the displayed IP matches your Toolip proxy settings to confirm the integration is successful.
You’ve now successfully integrated **Toolip** with **Helium Scraper**. Enjoy secure and efficient web scraping with enhanced privacy and flexibility! 🚀