> ## Documentation Index
> Fetch the complete documentation index at: https://docs.toolip.io/llms.txt
> Use this file to discover all available pages before exploring further.
# How to Set Up Toolip With Ghost Browser
> Streamline multi-account management with Toolip and Ghost Browser, ensuring secure and anonymous browsing while boosting your productivity.
 ## What is Ghost Browser?
**Ghost Browser** is a productivity-focused web browser tailored for users managing multiple online accounts or projects. Its standout **multi-session feature** allows you to open separate tabs, each functioning as an independent browser session. This lets you log into multiple accounts on the same platform without interference.
While not designed for advanced anti-detection needs, Ghost Browser is ideal for professionals who value organization, efficiency, and simplicity in their workflows.
Prefer an enterprise-grade guide? Learn more about Oculus Proxies Ghost Browser Integration Guide.
Targeting search engines like Google, Bing, or Yandex requires a specialized proxy to ensure stable access and avoid blocks. **Toolip’s Search Engine ISP Proxies** are designed specifically for this, providing reliable performance where standard proxies may fail. If your proxy test isn't working on search engines, switching to **Search Engine ISP Proxies** can resolve the issue.
1\. Visit the [Ghost Browser website](https://ghostbrowser.com/download/) and download the application.
2\. Install the browser and log in to your account to access the main interface.
1\. In **Ghost Browser**, locate and click the **Ghost Proxy Control** icon in the top-right corner.
2\. Select **Add/Edit Proxies** from the dropdown menu.
## What is Ghost Browser?
**Ghost Browser** is a productivity-focused web browser tailored for users managing multiple online accounts or projects. Its standout **multi-session feature** allows you to open separate tabs, each functioning as an independent browser session. This lets you log into multiple accounts on the same platform without interference.
While not designed for advanced anti-detection needs, Ghost Browser is ideal for professionals who value organization, efficiency, and simplicity in their workflows.
Prefer an enterprise-grade guide? Learn more about Oculus Proxies Ghost Browser Integration Guide.
Targeting search engines like Google, Bing, or Yandex requires a specialized proxy to ensure stable access and avoid blocks. **Toolip’s Search Engine ISP Proxies** are designed specifically for this, providing reliable performance where standard proxies may fail. If your proxy test isn't working on search engines, switching to **Search Engine ISP Proxies** can resolve the issue.
1\. Visit the [Ghost Browser website](https://ghostbrowser.com/download/) and download the application.
2\. Install the browser and log in to your account to access the main interface.
1\. In **Ghost Browser**, locate and click the **Ghost Proxy Control** icon in the top-right corner.
2\. Select **Add/Edit Proxies** from the dropdown menu.
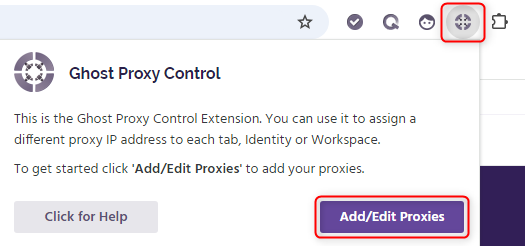 1\. In the **Proxy Manager**, click **Add a Single Proxy** to start configuring a new connection.
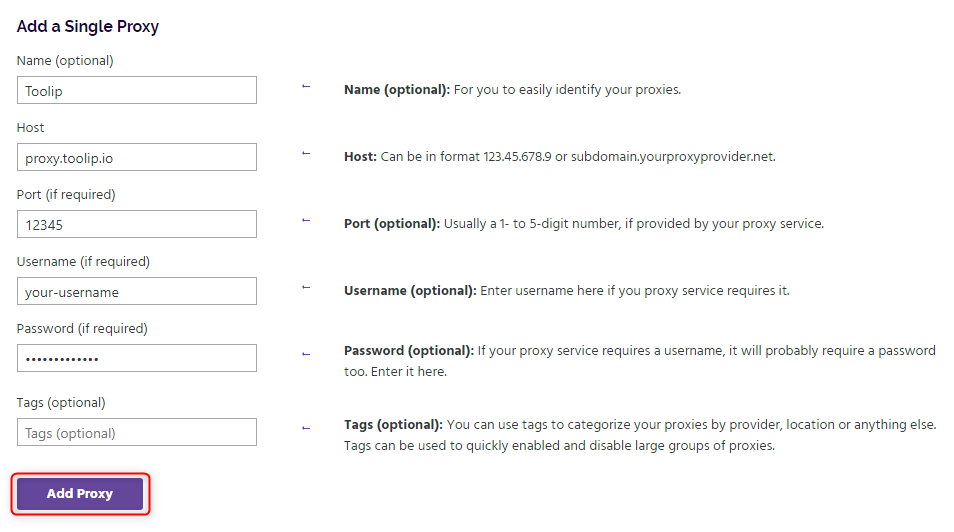
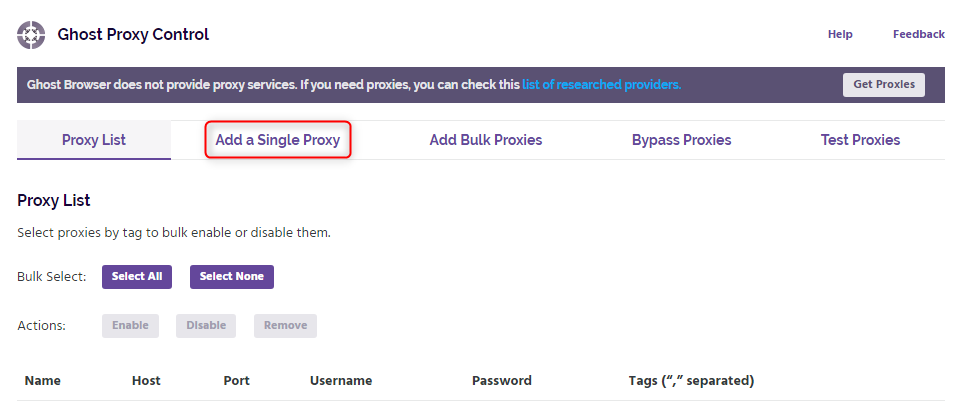 1\. In the proxy setup window, input the following details:
* **Name** (Optional): Assign a descriptive name like "Toolip" for easy identification.
* **Host**: `proxy.toolip.io`
* **Port**: Use the port number from your [Toolip dashboard](https://toolip.io/dashboard/page/plans).
* **Username**: Your Toolip username.
* **Password**: Your Toolip password.
2\. Click **Add Proxy** to save your configuration.
1\. In the proxy setup window, input the following details:
* **Name** (Optional): Assign a descriptive name like "Toolip" for easy identification.
* **Host**: `proxy.toolip.io`
* **Port**: Use the port number from your [Toolip dashboard](https://toolip.io/dashboard/page/plans).
* **Username**: Your Toolip username.
* **Password**: Your Toolip password.
2\. Click **Add Proxy** to save your configuration.
 **For country-specific proxies, use the format `your-username-country-US` to receive a US exit node.**
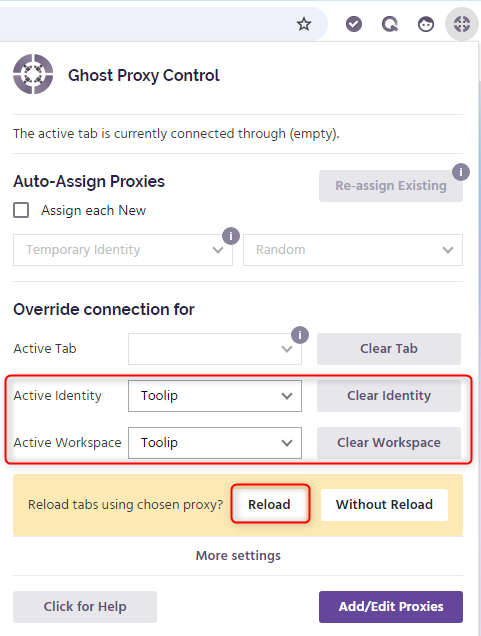
1\. Return to the **Ghost Proxy Control** menu.
2\. Under **Active Identity** and **Active Workspace**, select the Toolip proxy you just added.
3\. **Reload** your tabs to ensure the selected proxy is applied to your browsing session.
**For country-specific proxies, use the format `your-username-country-US` to receive a US exit node.**
1\. Return to the **Ghost Proxy Control** menu.
2\. Under **Active Identity** and **Active Workspace**, select the Toolip proxy you just added.
3\. **Reload** your tabs to ensure the selected proxy is applied to your browsing session.
 Your **Toolip** is now fully integrated with **Ghost Browser**. Enjoy seamless account management, secure browsing, and enhanced efficiency in your daily workflows. 🚀