> ## Documentation Index
> Fetch the complete documentation index at: https://docs.toolip.io/llms.txt
> Use this file to discover all available pages before exploring further.
# How to Configure Proxy Settings in Chrome
> Transform your browsing with proxies in Chrome! They’re perfect for safeguarding your privacy, accessing restricted sites, and juggling multiple accounts. In this guide, we’ll walk you through the setup and help you make the most of Chrome proxies.
 Prefer an enterprise-grade guide? Learn more about Oculus Proxies Chrome Proxy Setup.
Targeting search engines like Google, Bing, or Yandex requires a specialized proxy to ensure stable access and avoid blocks. **Toolip’s Search Engine ISP Proxies** are designed specifically for this, providing reliable performance where standard proxies may fail. If your proxy test isn’t working on search engines, switching to **Search Engine ISP Proxies** can resolve the issue.
## How to Change Proxy Settings in Chrome
1\. Launch **Google Chrome**.
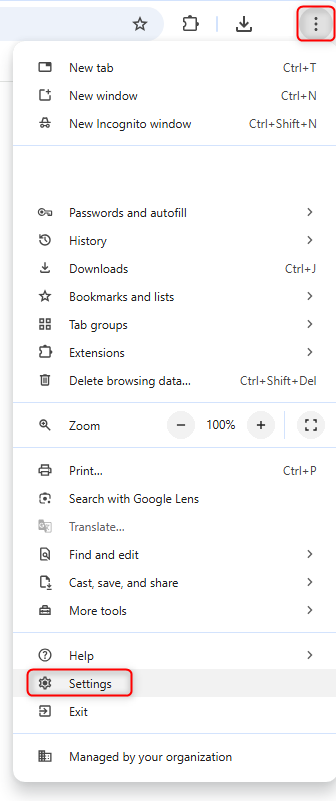
2\. Click the **three-dot menu** in the top-right corner.
3\. Select **Settings** from the dropdown.
Prefer an enterprise-grade guide? Learn more about Oculus Proxies Chrome Proxy Setup.
Targeting search engines like Google, Bing, or Yandex requires a specialized proxy to ensure stable access and avoid blocks. **Toolip’s Search Engine ISP Proxies** are designed specifically for this, providing reliable performance where standard proxies may fail. If your proxy test isn’t working on search engines, switching to **Search Engine ISP Proxies** can resolve the issue.
## How to Change Proxy Settings in Chrome
1\. Launch **Google Chrome**.
2\. Click the **three-dot menu** in the top-right corner.
3\. Select **Settings** from the dropdown.
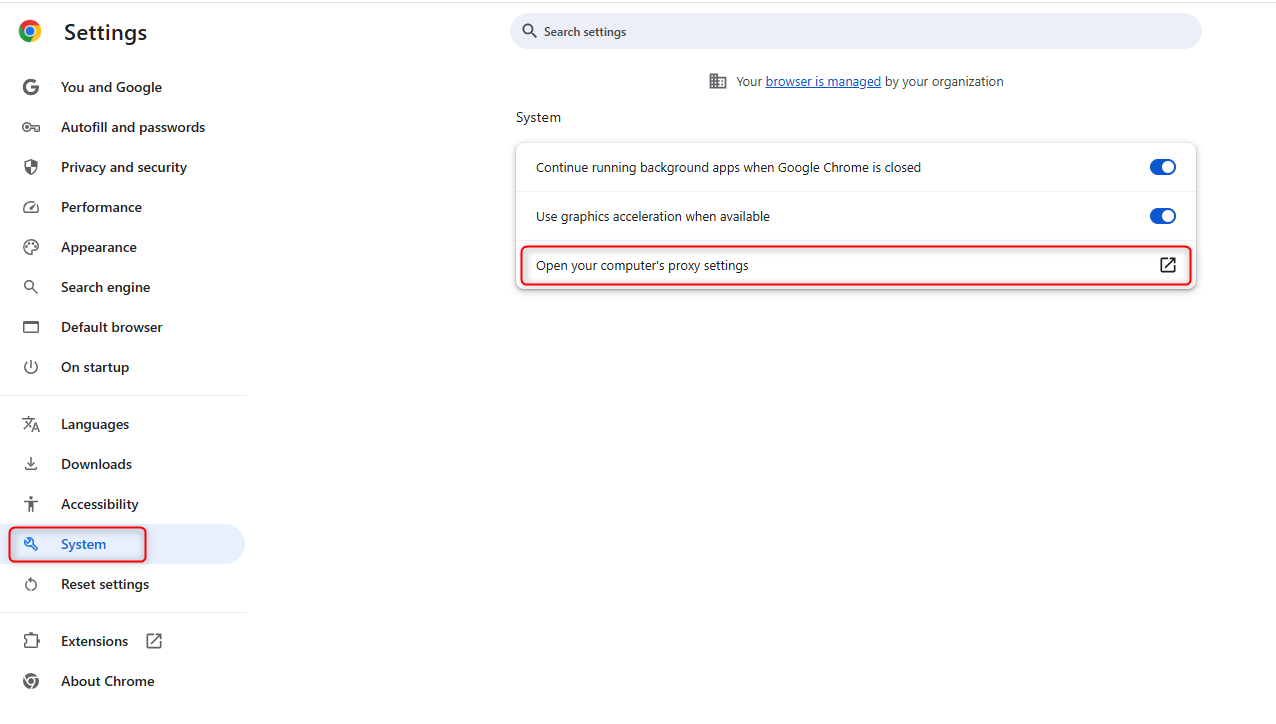
 1\. Scroll down and click **System** in the left-hand menu.
2\. Click **Open your computer’s proxy settings**.
1\. Scroll down and click **System** in the left-hand menu.
2\. Click **Open your computer’s proxy settings**.
 Since Chrome relies on your operating system's proxy settings, follow the respective guide to complete the setup:
Follow the step-by-step guide for Windows proxy configuration [here](https://docs.toolip.io/integration-guides/windows).
Follow the step-by-step guide for macOS proxy configuration [here](https://docs.toolip.io/integration-guides/macos).
That’s it! Chrome is now configured to use **Toolip**. Whether you’re managing multiple accounts, accessing geo-specific content, or browsing privately, your connection is now **secure and anonymous**. 🚀
Since Chrome relies on your operating system's proxy settings, follow the respective guide to complete the setup:
Follow the step-by-step guide for Windows proxy configuration [here](https://docs.toolip.io/integration-guides/windows).
Follow the step-by-step guide for macOS proxy configuration [here](https://docs.toolip.io/integration-guides/macos).
That’s it! Chrome is now configured to use **Toolip**. Whether you’re managing multiple accounts, accessing geo-specific content, or browsing privately, your connection is now **secure and anonymous**. 🚀