> ## Documentation Index
> Fetch the complete documentation index at: https://docs.toolip.io/llms.txt
> Use this file to discover all available pages before exploring further.
# How to Set Up Toolip on Android 🤖
> Quickly set up Toolip on your Android device to enjoy private, secure browsing. This guide covers configurations for both mobile data and Wi-Fi.
Setting up a proxy server on Android is simple and flexible. You can configure it for **Mobile Data** or **Wi-Fi**. Just choose your network type and follow these steps to get started!
Prefer an enterprise-grade guide? Learn more about Oculus Proxies Android Proxy Setup.
Targeting search engines like **Google, Bing, or Yandex** requires a specialized proxy to ensure stable access and avoid blocks. **Toolip’s Search Engine ISP Proxies** are designed specifically for this, providing reliable performance where standard proxies may fail. If your proxy test isn't working on search engines, switching to **Search Engine ISP Proxies** can resolve the issue.
1\. Go to **Settings** on your Android device.
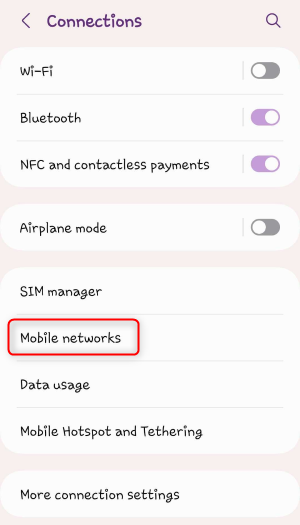
2\. Navigate to **Network & Internet** (or **Connections**, depending on your device).
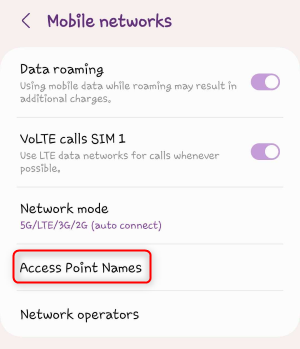
1\. Select **Mobile Networks**, then tap **Access Point Names (APNs)**.
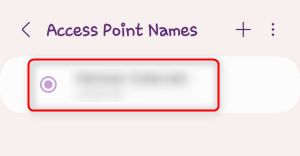
2\. Choose your active APN from the list.
 1\. Fill in the following details:
* **Proxy**: Input `proxy.toolip.io`.
* **Port**: Use the port number from your [Toolip dashboard](https://toolip.io/dashboard/page/plans).
* **Username**: Enter your Toolip proxy username.
* **Password**: Enter your Toolip proxy password.
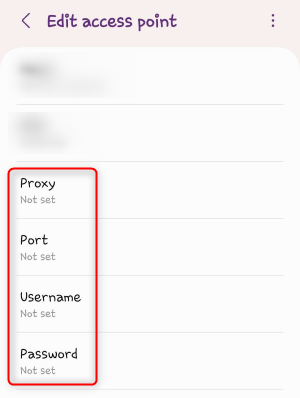
1\. Fill in the following details:
* **Proxy**: Input `proxy.toolip.io`.
* **Port**: Use the port number from your [Toolip dashboard](https://toolip.io/dashboard/page/plans).
* **Username**: Enter your Toolip proxy username.
* **Password**: Enter your Toolip proxy password.
 1\. Save your changes to the APN.
2\. Refresh your mobile data connection by toggling it off and on.
1\. Go to **Settings** and navigate to **Network & Internet** (or **Connections**) > **Wi-Fi**.
1\. Save your changes to the APN.
2\. Refresh your mobile data connection by toggling it off and on.
1\. Go to **Settings** and navigate to **Network & Internet** (or **Connections**) > **Wi-Fi**.
 2\. Tap on your connected Wi-Fi network.
3\. Open the **Settings** (or **Edit**) icon.
2\. Tap on your connected Wi-Fi network.
3\. Open the **Settings** (or **Edit**) icon.
 1\. Scroll to **Advanced Options**.
2\. Set the Proxy setting to **Manual**.
1\. Fill in the following fields:
* **Host**: `proxy.toolip.io`
* **Port**: Use the port from your [Toolip dashboard](https://toolip.io/dashboard).
2\. Tap **Save** to apply the changes.
1\. Scroll to **Advanced Options**.
2\. Set the Proxy setting to **Manual**.
1\. Fill in the following fields:
* **Host**: `proxy.toolip.io`
* **Port**: Use the port from your [Toolip dashboard](https://toolip.io/dashboard).
2\. Tap **Save** to apply the changes.
 You’ve successfully configured **Toolip proxies** on your **Android** device. Enjoy private, secure browsing with enhanced access and safety. Whether you're accessing blocked websites or protecting your data, **Toolip** has you covered!